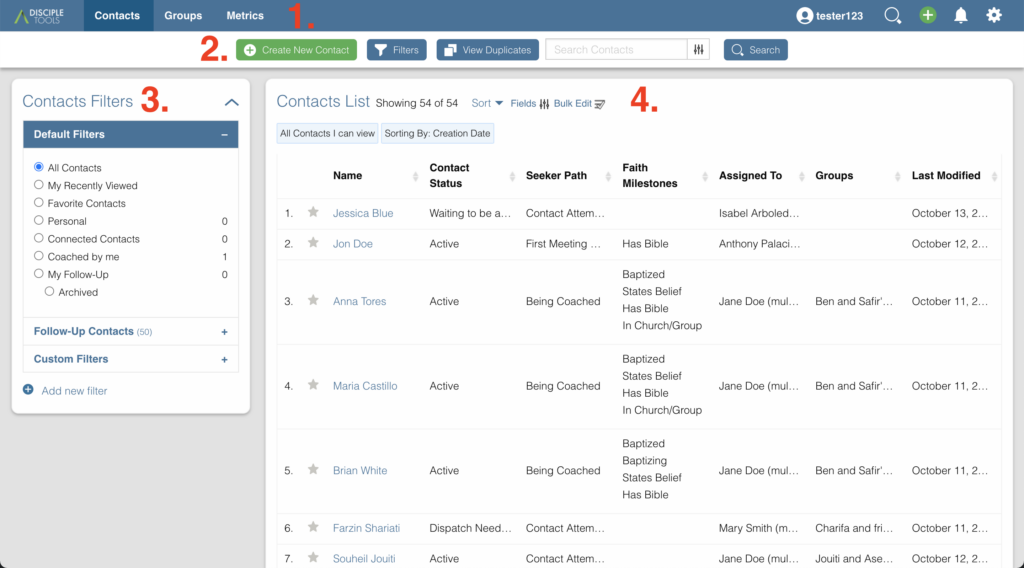
- Website Menu Bar
- Contacts List Toolbar
- Contacts Filters Tile
- Contacts List Tile
1.Website Menu Bar (Contacts) #
The Website Menu Bar will remain at the top of every page of Disciple.Tools.

- Dashboard: By clicking this, you will arrive to the user dashboard. Dashboard, is an optional choice available via plug-in.
- Contacts: By clicking this, you will arrive to the
contact list page. - Groups: This will take you to the Groups List Page.
- Metrics: This will take you to the Metrics Page.
- User
 Your name or username (defined in your profile) will show up here so you will know that you are correctly logged into your account.
 - Notification Bell: Anytime you receive a notification, a small red number will display here
 to inform you of the number of new notifications you have. You can edit the type of notifications you want to receive under Settings.
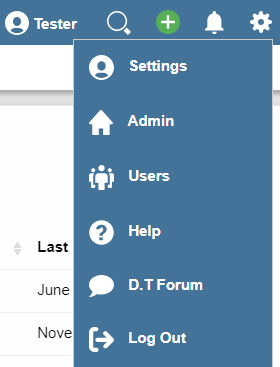
 - Settings Gear: By clicking on the settings gear
 , you will be able to define:
- Settings: Change your personal profile information, your notification preferences, and your availability.
- Admin: This option is only available to select Roles (i.e. DT Admin, Dispatcher). It will give them access to wp-admin backend of the Disciple.Tools instance. From here, the DT Admin can modify locations, people groups, custom lists, extensions, users, etc.
- Users: This option is only available to those with a DT Admin role. It gives them the ability to view a list of users and define new users.
- Help: View the Disciple.Tools’ Documentation Help Guide
- D.T Forum: An opportunity for the Disciple.Tools community to ask questions and share experiences.
- Log Off: Log out of Disciple.Tools completely. If you click on this you will have to log in again using your email and password.

2. Contacts List Toolbar #

Create New Contact #
The  button is located at the top of the
 Contacts List page. This button allows you to add a new contact record to Disciple.Tools. Other multipliers can’t see contacts you add, but those with the roles of of Admin and Dispatcher (the one responsible for assigning new contacts to be coached) can see them. Learn more about the Disciple.Tools Roles and their varying permission levels.

Clicking this button will open up a modal. Within this modal you will be presented with options for creating a new contact.
- Name of contact: A required field.
- Personal Information: Several fields not required. More information will makes this contact easier to find and track in the future.
- Source: Where this contact came from. Clicking this will bring up a list of the current options:
- Personal
- Web
- Transfer

After filling out the options click on ![]() or optionally click on show all fields. Either way, additional fields will be made available.
or optionally click on show all fields. Either way, additional fields will be made available.
- Assigned To: You can add names by searching for them and then clicking on the name in the search field. Automatically assigned to the user adding the new contact.
- Sub Assigned: You can add names by searching for them and then clicking on the name in the search field.
Search Contacts
Type a contact’s name to quickly search for him or her. This will search all the contacts you have access to. If there is a name that matches, it will show in the list.

3. Contacts Filters #
Eventually, there may be thousands of contacts. Filtering is a useful tool in finding a particular contact or set of contacts with a common feature (like location).
4. Contacts List #
This section contains a list of the private contacts of the user, as well as, the standard contacts assigned by a dispatcher or D.T Admin. By default, contacts will not be shared between users. See share below for how to share a contact with another user.

 to inform you of the number of new notifications you have. You can edit the type of notifications you want to receive under Settings.
 , you will be able to define: