Custom Tiles
DescriptionThis page allows you to create a new tile or modify existing tiles.How to access:
- Access the admin backend by clicking on the
 on the top right and then click
 Admin. - In the left hand column, select
Settings (DT). - Click the tab titled
Custom Tiles.
Modify an existing tile
Note
The dropdown list will be empty if no custom tiles have been created for your instance of DT. Once one or more tiles have been created, then they will listed here and then be modifiable.
Choose an existing tile from the dropdown list (which are sorted into Contact Tiles and Group Tiles and People Group Tiles) then click Select.
Tile Settings
- Change the name of the tile then click
Save - Click
Hide the tile on pageif you do not want the tile to appear in the frontend.
Tile Fields
If there is more than one field in the custom tile you are modifying, then you will be able to change the order that the fields appear in. Use the  buttons to modify the order of the fields.
Create a new tile
- Click the
Add new tilebutton. - Select what type of page the tile will appear on: Contacts or Groups or People Groups.
- Give the tile a name in the empty field next to
New Tile Name - Click
Create tile
Custom Fields
This page allows you to create a new field or modify existing fields.How to access:
- Access the admin backend by clicking on the
 on the top right and then click
 Admin. - In the left hand column, select
Settings (DT). - Click the tab titled
Custom Fields.
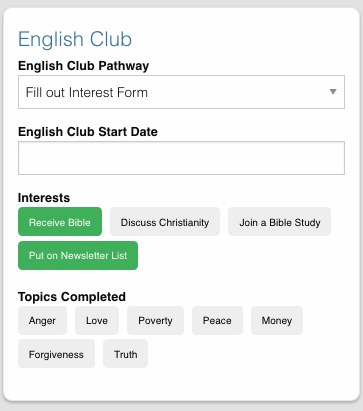
DescriptionA Tile is a section within the Contact/Group Record Pages (i.e. Details tile). A Tile is made up of Fields.
Example Tile and Fields

This English Club Tile is made up of the following fields:
- English Club Pathway
- English Club Start Date
- Interests
- Topics Completed
The Interests field, for example, is made up of the following options:
- Receive Bible
- Discuss Christianity
- Join a Bible Study
- Put on Newsletter List
Build a Complete Tile
How to access:
- Access the admin backend by clicking on the
 on the top right and then click
 Admin. - In the left hand column, select
Settings (DT). - Click the tab titled
Custom Tiles.
Create a new tile:
- Click
Add a new tile - Select whether it will be found in the Contact or Group page type
- Name it.
- Click
Create Tile
Create new fields
- Under
Custom Fields, clickCreate new field - Select whether it will be found in the Contact or Group page type
- Select the Field Type
- Dropdown: Select an option for a dropdown list
- Multi Select: A field like the milestones to track items like course progress
- Text: This is just a normal text field
- Date: A field that uses a date picker to choose dates (like baptism date)
- Select the name of the new Tile you created
- Click
Create Field - Add the options for Dropdown and Multi Select fields
- Under
Field Options, next toAdd new option, insert the name of the option and clickAdd - Continue adding until you have all of your preferred options.
- Under
- Click
Save - Repeat steps 1-7 until you have all of your desired fields for the Tile
Preview Tile
Preview your tile within the Contact or Group Record by returning to the frontend. Click the ![]() icon to return.
icon to return.
To modify the tile, fields, and options, click the  icon and Admin to return to the backend.
Modify Tiles, Fields, and Options
Modify Tile
Under Custom Tiles, next to Modify an existing tile, select the name of the tile you want to modify
- Adjust the order of the fields by clicking the up and down arrows.
- Rename the tile by changing the Label name under
Tile Settings - Hide the tile by clicking
Hide tile on page
Modify Field
Under Custom Fields, next to Modify an existing field, select the name of the field you want to modify
- Adjust the order of the field options by clicking the up and down arrows
- Hide the field options by clicking
Hide - Rename the field by changing the Label name under
Field Settings
Note
You do not have the ability to modify every Disciple.Tools field. You, however, can modify any new field you create. The other default fields you can currently modify are:
Contact Fields:
- Contact Status
- Seeker Path
- Faith Milestones
- Reason Not Ready
- Reason Paused
- Reason Closed
- Sources
Group Fields:
- Group Type
- Church Health
People Groups Fields: (coming soon!)
