
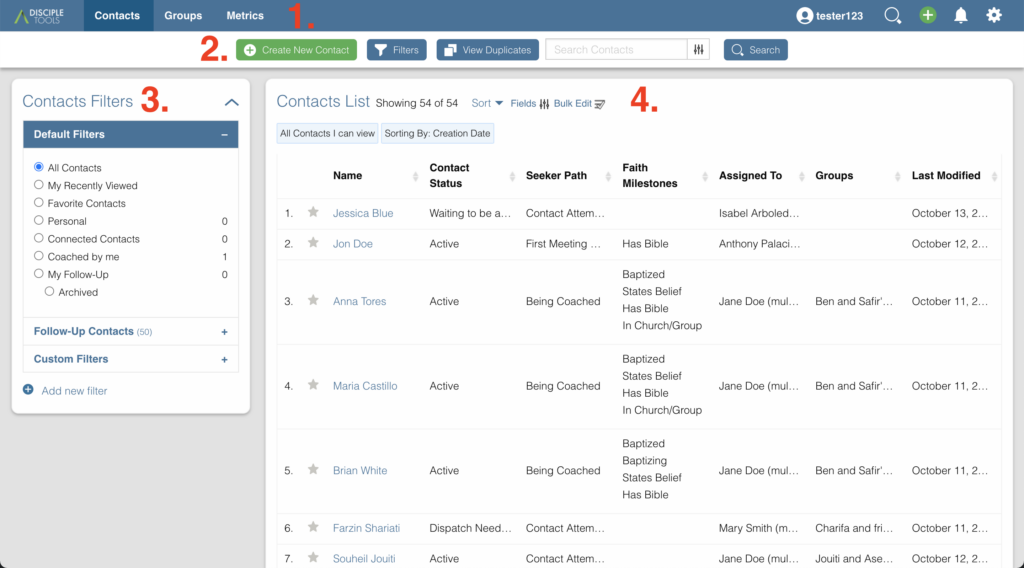
- Website Menu Bar
- Contacts List Toolbar
- Contacts Filters Tile
- Contacts List Tile
1.Website Menu Bar (Contacts)
The Website Menu Bar will remain at the top of every page of Disciple.Tools.

Disciple.Tools Beta Logo
Disciple.Tools has not been publicly released. Beta means that this software is still in development and is rapidly evolving. Expect to see changes. We ask for your grace and patience as you utilize this software.
Contacts
By clicking this, you will arrive to the Contacts List Page.
Groups
This will take you to the Groups List Page.
Metrics
This will take you to the Metrics Page.
User 
Your name or username will show up here so you will know that you are correctly logged into your account.
Notification Bell
Anytime you receive a notification, a small red number will display here  to inform you of the number of new notifications you have. You can edit the type of notifications you want to receive under Settings.
Settings Gear
By clicking on the settings gear  , you will be able to:
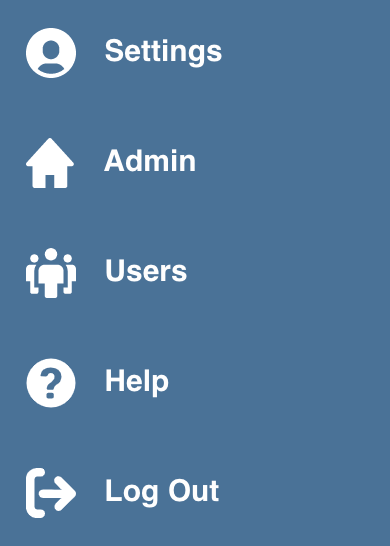
- Settings: Change your personal profile information, your notification preferences, and your availability.
- Admin: This option is only available to select Roles (i.e. DT Admin, Dispatcher). It will give them access to wp-admin backend of the Disciple.Tools instance. From here, the DT Admin can modify locations, people groups, custom lists, extensions, users, etc.
- Help: View the Disciple.Tools’ Documentation Help Guide
- Add Demo Content: If you are using Disciple.Tools’ Demo option, you will see this. Click this to add fake demo data that you can use to practice using Disciple.Tools, take our interactive demo tutorial, or train others on how to use the software.
- Log Off: Log out of Disciple.Tools completely. If you click on this you will have to log in again using your email and password.
2. Contacts List Toolbar

Create New Contact
The  button is located at the top of the
 Contacts List page. This button allows you to add a new contact record to Disciple.Tools. Other multipliers can’t see contacts you add, but those with the roles of of Admin and Dispatcher (the one responsible for assigning new contacts to be coached) can see them. Learn more about the Disciple.Tools Roles and their varying permission levels.

Disciple.Tools values the security and safety of all users and contacts.
Clicking this button will open up a modal. Within this modal you will be presented with options for creating a new contact.
- Name of contact: A required field that is the name of the contact.
- Phone number: A phone number to reach the contact.
- Email: An email to reach the contact.
- Source: Where this contact came from. Clicking this will bring up a list of the current options:
- Web
- Phone
- Referral
- Advertisment

These options can be modified by those with the Admin, DT Admin, and Dispatcher Roles.
- Location: This is where the contact lives. Clicking this will bring up a list of locations that were previously created in the wp-admin backend by the DT Admin Role. You cannot add a new location here. You will have to add new locations in the wp-admin backend of your Disciple.Tools instance first.
- Initial comment: This is for any other info you need to put about the contact. It will be saved under the Activity and Comments Tile in the Contact’s Record.
After filling out the options click on 
Filter Contacts
After a while, you may end up with a pretty long list of contacts all progressing at different points. You will want to be able to filter and search for who you need quickly. Click ![]() to begin. On the left hand side are the Filter Options. You can select multiple options for one filter (i.e. baptized contacts in XYZ location). Click
to begin. On the left hand side are the Filter Options. You can select multiple options for one filter (i.e. baptized contacts in XYZ location). Click Cancel to stop the filtering process. Click Filter Contacts to apply the filter.

You can only have one filter active at a time.
Contacts Filter Options
Assigned To
- This option will allow you to add names of people who have been assigned a contact.
- You can add names by searching for them and then clicking on the name in the search field.
Sub Assigned
- This option will allow you to add names of people who have been sub-assigned a contact.
- You can add names by searching for them and then clicking on the name in the search field.
Locations
- This option will allow you to add locations of contacts to filter for.
- You can add a location by searching for it and then clicking on the location in the search field.
Overall Status
- This tab will allow you to filter based on a contact’s overall status.
- To add a filter option click on the checkbox next to the filter options you want to add.
- Default status filters are as follows:
- Unassigned
- Assigned
- Active
- Paused
- Closed
- Unassignable
Seeker Path
- This tab will allow you to filter based on a contact’s seeker path.
- To add a filter option click on the checkbox next to the filter options you want to add.
- Default seeker path filters are as follows:
- Contact Attempt Needed
- Contact Attempted
- Contact Established
- First Meeting Scheduled
- First Meeting Complete
- Ongoing Meetings
- Being Coached
Faith milestones
- This tab will allow you to filter based on a contact’s faith milestones.
- To add a filter option click on the checkbox next to the filter options you want to add.
- Default faith milestone filters are as follows:
- Has Bible
- Reading Bible
- States Belief
- Can Share Gospel/Testimony
- Sharing Gospel/Testimony
- Baptized
- Baptizing
- In Church/Group
- Starting Churches
Requires Update
- This tab will allow you to filter based on if a contact requires an update.
- To add a filter option click on the checkbox next to the filter options you want to add.
- There are two default options:
- Yes
- No
Tags
- This tab will allow you to filter based on custom tags you have created. (e.g. hostile)
- To add a filter option click on the checkbox next to the filter options you want to add.
- The options will be varied based on your tags.
Sources
- This tab will allow you to filter based on if a contact requires an update.
- You can add a Source by searching for it and then clicking on the Source in the search field.
- There are eight default options:
- Advertisement
- Personal
- Phone
- Referral
- Web
Gender
- This tab will allow you to filter based on the source the contact came from
- To add a filter option click on the checkbox next to the filter options you want to add.
- There are two default options:
- Male
- Female
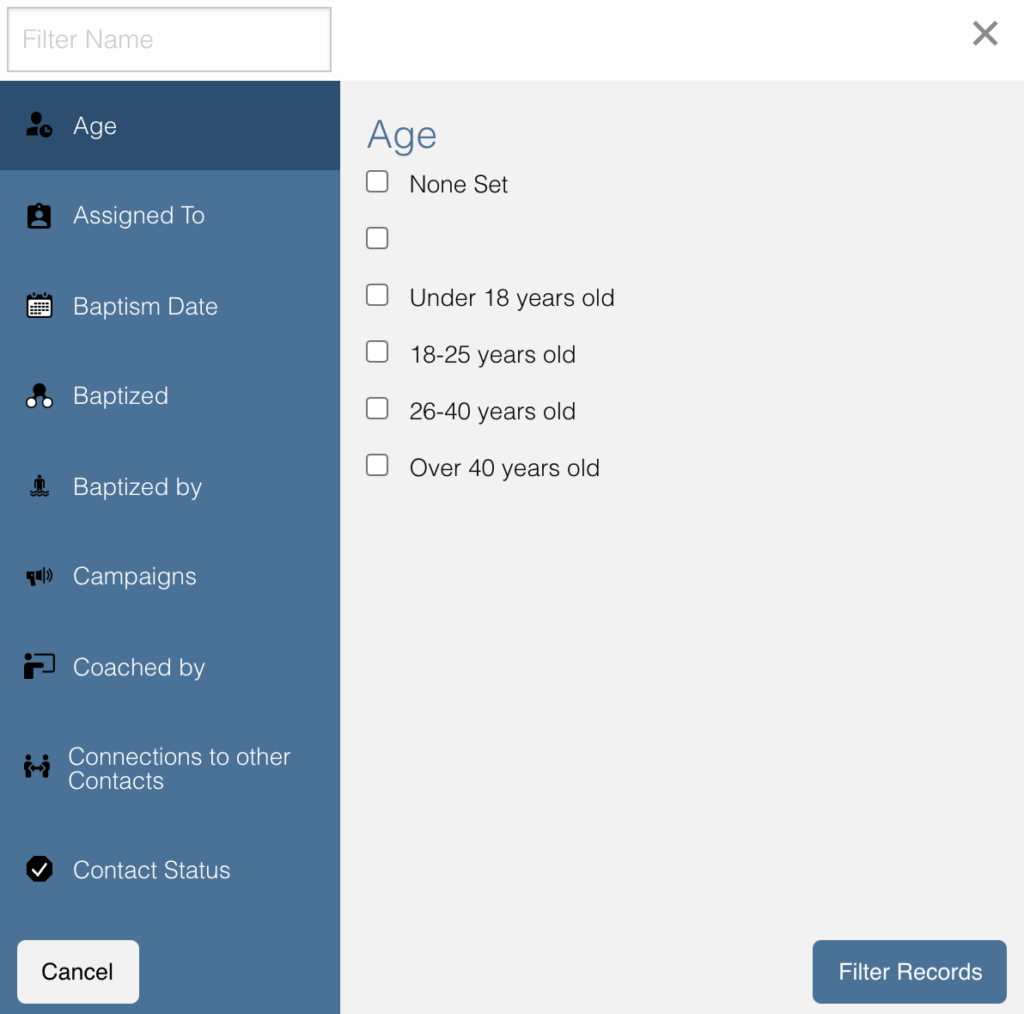
Age
- This tab will allow you to filter based on a contact’s age range
- To add a filter option click on the checkbox next to the filter options you want to add.
- There are four default options:
- Under 18 years old
- 18-25 years old
- 26-40 years old
- Over 40 years old
Reason Unassignable
- This tab will allow you to filter based on why a contact is labeled as Unassignable
- To add a filter option click on the checkbox next to the filter options you want to add.
- There are six default options:
- Insufficient Contact Information
- Unknown Location
- Only wants media
- Outside Area
- Needs Review
- Waiting for Confirmation
Reason Paused
- This tab will allow you to filter based on why a contact is labeled as Paused
- To add a filter option click on the checkbox next to the filter options you want to add.
- There are two default options:
- On Vacation
- Not Responding
Reason Closed
- This tab will allow you to filter based on why a contact is labeled as Closed
- To add a filter option click on the checkbox next to the filter options you want to add.
- There are 12 default options:
- Duplicate
- Hostile
- Playing games
- Only wants to argue or debate
- Insufficient contact info
- Already in church or connected with Others
- No longer interested
- No longer responding
- Just wanted media or book
- Denies submitting contact request
- Unknown
- Closed from Facebook
Accepted
- This tab will allow you to filter based on whether or not contacts have been accepted by a multiplier
- To add a filter option click on the checkbox next to the filter options you want to add.
- There are two default options:
- No
- Yes
Contact Type
- This tab will allow you to filter based on the type of contact
- To add a filter option click on the checkbox next to the filter options you want to add.
- There are four default options:
- Media
- Next Generation
- User
- Partner
Search Contacts
Type a contact’s name to quickly search for him or her. This will search all the contacts you have access to. If there is a name that matches, it will show in the list.

3. Contacts Filters Tile
The default filter options are located on the left of the page under the heading Filters. By clicking these, your list of contacts will change.
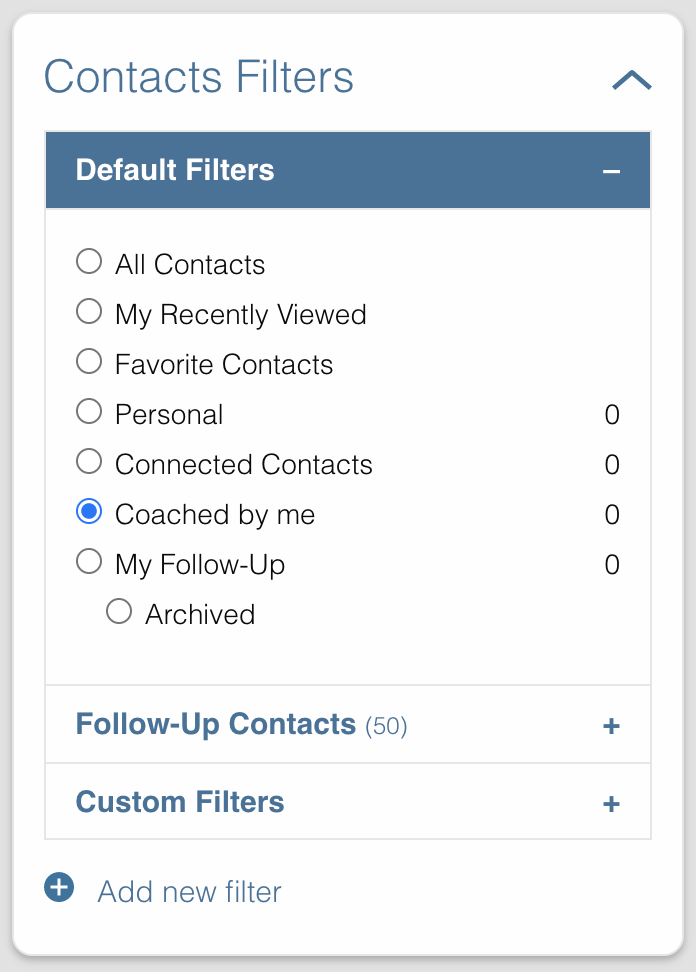
The Default Filters are:
- All contacts: Certain roles, such as Admin and Dispatcher, in Disciple.Tools allow you to view all contacts in your Disciple.Tools system. Other roles such as Multipliers will only see their contacts and contacts shared with them under
All contacts. - My Contacts: All contacts you personal create or have been assigned to you, can be found under
My Contacts.- Newly Assigned: These are contacts who have been assigned to you but you have not accepted yet
- Assignment Needed: These are contacts that the Dispatcher still needs to assign to a Multiplier
- Update Needed: These are contacts in need of an update about their progress so none fall through the cracks. This can be manually requested by a Dispatcher or automatically set based on time (e.g. No activity after 2 months).
- Meeting Scheduled: These are all contacts with whom you have scheduled a meeting but have not yet met.
- Contact Attempt Needed: These are contacts who you have accepted but have not yet made the first attempt to contact them.
- Contacts shared with me: These are all contacts who other users have shared with you. You do not have responsibility for these contacts but you can access them and comment if needed.
Adding Custom Filters (Contacts)
Add
If the default filters do not fit your needs, you can create your own Custom Filter. As mentioned above, you can click
 or
or  to begin. They will both take you to the
 New Filter modal. After clicking Filter Contacts, that Custom Filter option will appear with the word Save next to it.

To cancel these Custom Filters, refresh the page.
Save
To save a filter, click on the Save button next to the filter name. This will bring up a popup asking for you to name it. Type in the name of your filter and click Save Filter and refresh the page.
Edit
To edit a filter, click on the pencil icon next to a saved filter. This will bring up the filter options tab. The process for editing the filter options tab is the same as adding new filters.
Delete
To delete a filter, click on the trashcan icon next to a saved filter. It will ask for confirmation, click Delete Filter to confirm.
4. Contacts List Tile
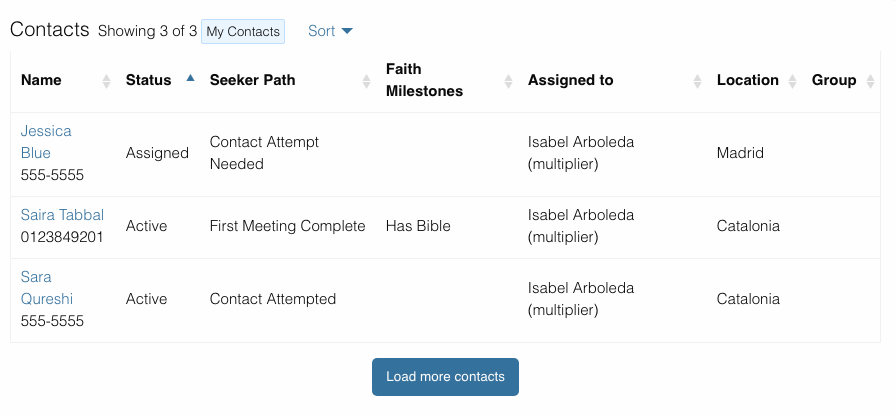
Contacts List
Your list of contacts will show up here. Whenever you filter contacts, the list will also be changed in this section too. Below are fake contacts to give you an idea of what it will look like.
Sort:
You can sort your contacts by newest, oldest, most recently modified, and least recently modified.
Load more contacts:
If you have a long list of contacts they will not all load at once, so clicking this button will allow you to load more. This button will always be there even if you do not have any more contacts to load.
Help Desk:
If you have an issue with the Disciple.Tools system, first try to find your answer in the Documentation How to Guide (found by clicking Help under Settings).

If you can’t find your answer there, click this question mark to submit a ticket about your issue. Please explain your issue with as much detail as possible.